Frequently Asked Questions
Welcome to our Frequently Asked Questions (FAQ) page, where you can find quick and easy answers to common questions about our products and policies. Our goal is to provide you with the information you need to make informed decisions and have a seamless experience with our company. If you can’t find the answer you’re looking for, feel free to contact our Sales & Customer Support team for further assistance.
Please click on any of the following questions to expand and reveal the answer.
1. Installation: How do I install the PTO Link®?
For important instructions and tips on Installing the PTO Link® system, CLICK HERE.
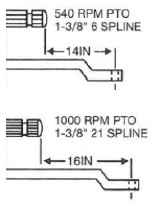
2. Specs: What are they?
Horse Power Rating
- PTO Link® Compact – Maximum tractor HP rating: 70 HP*(*limited to category 1 implements ONLY)
- PTO Link® HD – Maximum tractor HP rating: 130 HP
* See more details below
Design Features
- Modified AISI 4140 alloy steel—heat treated and hardened for superior durability
- CNC machine cut to engineered precision
- Liquid Salt Bath Nitride external coating
- Hardens surface up to 3X carbon steel
- Superior wear resistance
- Long-term protection against rust and corrosion.
Integrated Stud Connection
- (4) 1/2″ machined integrated Studs
- 145,000 psi ultimate tensile strength
- 91,000 psi Shear Strength
Spline Connection
- 6 Spline -ASABE ISO 500
- 130,000 psi Yield Strength
- 154,000 psi Tensile Strength
*PTO Link® Compact – Ideal for tractors up to 70HP and PTO splines less than 3″ in length. REQUIRED for the following tractor models: All Kubota BX, B and LX series, Kioti CS Series, John Deere 2520, Yanmar SA Series, New Holland Workmaster 25S, Cub Cadet 6284D, Bad Boy 3026, and LS MT125.
*PTO Link® HD – Ideal for tractors 35HP to 130HP. Also, for any tractor w/8′ or wider Shedders/Mowers, and any size Flexwing/Batwing rotary cutters.
NOTICE: For pull-behind implements with two-stage or “dual” drivelines (two distinct drivelines connected by a universal or CV joint located midway between the PTO and the main gearbox of the implement), the PTO Link® system may not be compatible and not generally recommended. Please call 833.444.5465 for evaluation or any questions.
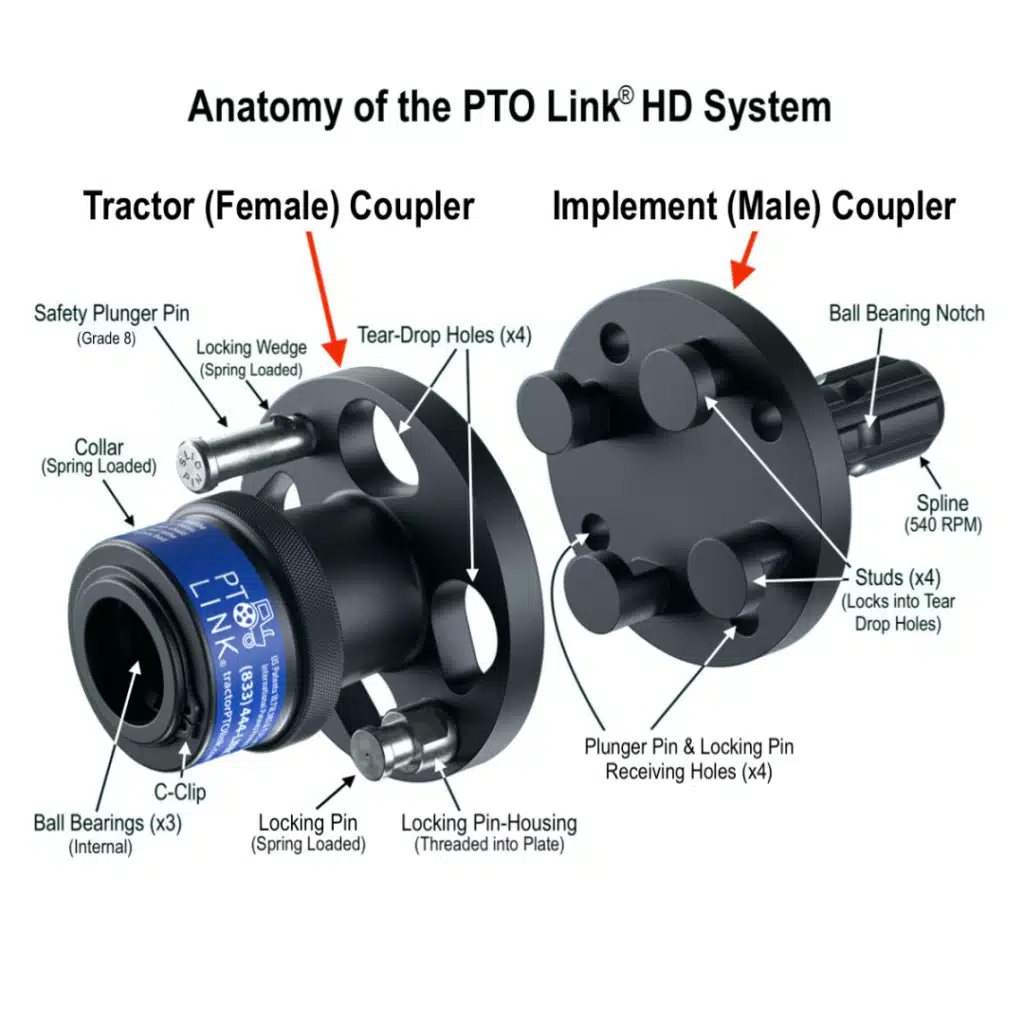
3. Identification: What are the parts called?
4. Does the PTO Link® Extend the Shaft?
Yes, the tractor’s PTO spline/driveline is extended by 114 mm (w/Compact) and 127 mm (w/HD) once equipped with the PTO Link® system. (See Implement Driveline Measuring Details found at FAQ #5)
5. INSTRUCTIONS for Measuring to Determine if I Need to Shorten my Driveline length (IMPORTANT!)
Many PTO Link® customers do NOT need to shorten their driveline to accommodate the 127 mm added by PTO Link®. However, everyone should verify whether this is necessary by first evaluating and comparing the following two measurements (a) and (b):
See Link Below – for Video of these Instructions
(a) Before installing PTO Link® and when the implement is fully connected to your tractor AND is sitting on level ground, measure the maximum distance the implement driveline slides in during a hydraulic lift* and after it has been lowered back to the ground, then ADD 25 mm to that measurement;
(b) Install each PTO Link® coupler to the tractor and implement, but do NOT connect the couplers yet. Then measure the distance between the two installed PTO Link® couplers (make sure they are facing square to each other and at the same height) when the driveline is fully collapsed (bottomed out toward the gearbox).
(b – 2nd option) If you don’t have the PTO Link® couplers yet, you can estimate measurement (b) by simulating the length added by the PTO Link®, by measuring the distance between the tip of the tractor PTO male spline and the tip of the Implement female receiver (make sure they are facing square to each other and at the same height) when the driveline is fully collapsed (bottomed out), then SUBTRACT 76 mm. [This will be your estimated (b) measurement, if the PTO Link® was installed]. Note: this measurement is for estimation purposes only. The most accurate measurement (when determining whether to cut the driveline) is best measured once the PTO Link® is fully installed.
Take the above measurements and compare the following:
If (a) is less than or equal to (b), then no adjustment is necessary.
If (a) is greater than (b), then the difference [(a) minus (b)] is the recommended amount to shorten the driveline.
OPTIONS: Of course, a helpful alternative to shorten the driveline is to install a quick-hitch system to your 3 point hitch (e.g., Pat’s Easy Change, iMatch, etc.) which lengthens the distance between your tractor and implement and tends to offset most** of the PTO driveline length added by PTO Link®.
*EXCEPTIONS: With some smaller tractors (when using a tiller or stump grinder) the driveline will actually collapse further when being lowered ‘into the ground’ (from ground level). Therefore, pay special attention to how your driveline slides during use to avoid incorrect measuring when confirming if driveline slide is adequate. NOTE: For tractor Post Hole Diggers / Auger implements, see (F.A.Q. #6) for special instructions.
**REMEMBER, if your 3 point quick hitch was installed by the dealer at the time of purchase of the tractor, 3 point quick hitch and implement, then the driveline will likely not have been cut down as much since the 3 point quick hitch was used as part of the final measuring evaluation by your dealer.
If you have any questions, need additional guidance or curious as to how easy adjusting (cutting) the driveline is (see FAQ #1 – last video), feel free to call our Customer Care Helpline at: 01433 711 922.
This is a Video Demonstration for the above Instructions:
For other PTO Link® Installation Videos, please click the “Installation” tab.
6. How to measure the driveline when installing the PTO Link® on a Post Hole Digger / Auger (using the "tape test")?
The above instructions and video do not cover measuring with a posthole digger/Auger… so this is what we recommend:
First connect the Auger to the tractor, but before connecting the PTO, manually collapse (bottom out) your driveline (by hand) toward the implement gear box. Notice where the two shields overlap and place two pieces of visible tape (like painter’s tape) to both of the covers (where they overlap each other)… that will give you a visible indicator of where your driveline bottoms out. THEN, install the PTO Link®.
As you’re digging, watch those two pieces of tape as they move closer together as you go deeper into the ground. We recommend you keep them 25 mm apart (i.e. the Measurement A’s “safety gap of 25 mm” in the video) during operation.
Remember, installing the PTO Link® System adds 114 to 127 mm to the driveline length, so watching the two marked locations with tape will tell you if you need to adjust your driveline and also becomes a way to measure to determine if further driveline adjustments are needed.
We don’t cover this tip on the driveline measuring video because that is one implement that is hardest to get “pre-install measurements” for, when using the “driveline measuring guideline” (video #1) https://uk.pto.link/videos/
For all other implements, please use the video guide at FAQ #5, to determine if you need to adjust the implement driveline.
If you need further assistance, please call our Customer Care Helpline at: 01433 711 922.
7. What is the ‘FreeWheel’ PTO feature and how to use it?
In our video guides we often refer to the benefits of using the “free-wheel option” on your tractor’s PTO – when coupling the PTO Link® system. We have gotten various feedback when this is mentioned, including some who have never heard of it. So, for those newer tractor owners who may not be familiar with this feature, here’s our best explanation. By the way, our wonderful customers share their experiences for these tips, and some ‘do’ and some ‘do not’ have this feature on their tractor, so please check yours to verify. If your tractor PTO free-wheels, that is usually the best way to make the connection… even easier!
A ‘free-wheeling’ PTO is when the tractor’s PTO will turn/rotate freely. When connecting the PTO Link® systems, this feature makes the PTO Link® quick-connecting system even easier! We have found various types of free-wheeling PTOs while testing and shooting our video guides. Some will free-wheel 100%, with no stops; some rotate a partial turn then stop; and some have literally no rotation at all.
Does my tractor free-wheel?
It makes perfect sense to NOT grab a grease-covered PTO tractor spline, so we understand that many new users may not know if their tractor has this option. So keep reading for important tips when checking for this tractor option.
How to check: For safety, always turn off your tractor engine (yes, it sounds obvious, but some leave it running – and we DO NOT recommend that!). Grab a rag and cover the greasy spline and test if it will rotate – and how much. You may find it turns freely or partially (as mentioned above). NOTE: If you already have the PTO Link® system, remember to install the Tractor (Female) Coupler onto the spline first, then test the rotation, using the clean PTO Link® Female coupler. No more greasy hands for you!
What if my tractor’s PTO does not free-wheel?
In some cases, your tractor may not free-wheel OR there may be a setting to enable it. Don’t assume anything – keep reading to know for sure.
For smaller tractors that have a belly mower option, customers tell us they will have multiple PTO settings… which is key. For instance, a ‘mid’, ‘mid and rear’, or ‘rear only’ PTO setting. We find most are successful by putting their PTO in the “Mid” setting – this will usually free up the rear PTO to spin freely. Some of our customers say they had no idea this setting would do the trick – so please check all available options to determine if your tractor has this capability.
Is your Tractor an ‘E’ model?
We get two responses to this. Some say their “E” model tractors won’t free-wheel – while some say their ‘E’ model will free-wheel. So please check your tractor’s operating manual, search online forums and/or call your dealer to confirm if your specific model has this option.
If you have tested and confirmed your tractor doesn’t free-wheel… here are some helpful tips collected over the years:
While we recommend using the free-wheeling option on the tractor side, if your tractor doesn’t have that feature, continue to use the implement side for rotation to connect/disconnect the PTO Link® coupling couplers.
If you can’t rotate the implement side easily, you may have a ground clearance issue. If so, make a partial hydraulic lift to raise your mower or tiller blades/tines off the ground so you can rotate your implement side to make the connection.
Use the PTO Align™ Spanner Wrench on the PTO Link® Implement Coupler spline installed inside the implement shaft’s female receiver. The Spanner Wrench is designed for just a task as this! The special offset angle of the Spanner Wrench will allow ease of access under the PTO Shield and connect at the splined narrow gap between the Implement coupler and the female receiver. See PTO Align™ Spanner Wrench page for more illustrations.
Some also use a large screwdriver or small pry bar in the u-joint area for greater leverage to manually rotate the implement side for connection. Note: be careful not to damage the grease zerk (located in this area).
Some say they have had to use a second person to rotate the blades of the tiller, belt-driven finishing mowers, flail mowers, batwings, etc. All of these options are unnecessary if you have a PTO that will free-wheel.
Please watch our video guide (#3 on the page), “Unboxing the PTO Link® System Pt 2 – Install & Connecting Tips” for a demonstration of free-wheeling and other helpful tips.
If you have any further tips for getting your tractor to free-wheel, or other ways to rotate the implement side (that are not mentioned above), please send me an email at [email protected] or call our Customer Care Helpline at: 01433 711 922.
8. How is PTO Link® different from the conventional spline connection?
It’s Easier to See: The Open-Plate™ design creates a completely new connecting interface between the PTO Link® Tractor and Implement Couplers, allowing for a more visible connection point at the PTO, by removing the blind angles you would typically encounter with a splined PTO connection. Now with PTO Link UK, you can actually see what you’re connecting to!
It’s Easier to Reach: Because the PTO Link® system adds about 76 mm of length to the PTO shaft, it provides an easier access point to complete the connection while still remaining under the PTO safety shield, and allowing more room to manoeuvre around your PTO.
It’s Easier to Connect: Connecting the PTO Link® is as simple as aligning the studs on the Implement Coupler to the oblong holes on the Tractor Coupler, completing a slight rotation of the couplers until the spring-loaded Locking Pin engages, and installing the Safety Bolt (Plunger Pin) to complete the connection. Disconnecting your implement only requires removing the Safety Bolt (Plunger Pin) and pulling the release on the spring-loaded Locking Pin.
9. How does PTO Link® save me time?
- Once the PTO Link® system is installed on each tractor and to each implement, the PTO Link® system permanently changes your PTO’s interface and never needs to be removed.
- PTO Link® essentially replaces the PTO spline with two interlocking steel couplers that quickly connect with a visible interface connection.
- Because the PTO Link® system accomplishes the tractor-implement connection in a matter of seconds, it eliminates most, if not all, of the typical time-consuming steps and frustrations associated with the conventional PTO connection.
- You can connect your implements independently! No need for a third hand or have to wait for your neighbor to help you connect your PTO!
10. How does the PTO Link® enhance safety during the PTO connection process?
Without PTO Link®, the perfect balance of five simultaneous actions are essentially required to successfully hook-up a driveline to the tractor’s rear PTO:
- Lift the implement shaft (which is often very heavy);
- Reach under the PTO safety shield (usually in an awkward or stooped position while lifting a heavy shaft or maneuvering through a quick hitch frame).
- Align the high precision splined fittings mostly by feel while trying to match up the connection from blind angles.
- Press the PTO yoke push pin (or Retract the spring-loaded collar of the implement shaft receiver).
- Slide the implement shaft forward at the exact linear and level angle to affix the receiver onto the ball bearing notch of the PTO’s spline, while meticulously coordinating steps 1 through 4 ALL AT THE SAME TIME — and hopefully without injury!
With PTO Link®
- The PTO Link® System safely eliminates the meticulous coordination of all the above steps with its patented Open-Plate™ design, which replaces the awkward spline-to-driveline connection and simplifies the hook-up process, reducing the task from minutes to seconds.
- Since it is easy to see and reach, it removes the danger of pinched fingers, busted knuckles, and strained backs.
- The assistive nature of PTO Link® reinvigorates the passion of tractor owners with physical and age-related limitations by allowing them to operate their tractors with renewed confidence and independence.
11. Does the PTO Link® adhere to industry safety standards regarding the safety shield?
Safety Standards: A few people in the tractor industry have asked if the PTO Link® adheres to certain safety standards, pointing out the added 114 to 127 mm of the PTO Link® system and whether it pushes out the new connection point of an implement driveline outside of the PTO safety shield.
Answer: Once installed and coupled together, the mated flanges of the PTO Link® system are actually itself under the peripheral edge of the master safety shield for most tractors. The standard depth of a master safety shield is roughly 165 mm, which gives the PTO Link® system plenty of space. (See illustration below from ASABE ISO standards)
In addition, PTO Link UK enhances the overall safety of the operator at the point of connection, inverting and replacing the traditional spline interface with an easy-to-see, visible open-plate interface, which actually removes the typical operator injuries inherently prone to and associated with most PTO connections. The use of PTO Link® at the point of connection actually promotes operator safety and avoids recurring injuries such as: pinched fingers, scraped knuckles, and strained back due to awkward positions and prolonged efforts to manually support and blindly align the female receiver of a heavy driveline at precise perpendicular and clocking angles while mating it to a rigid PTO spline shaft.
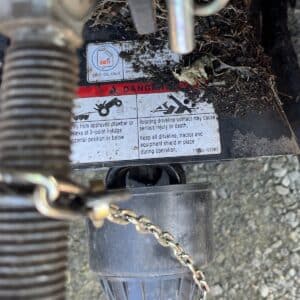
Moreover, through its product labelling and operating specifications, PTO Link UK promotes clear safety warnings to its users to shield all rotating parts and avoid any contact with PTO components until the tractor engine is completely off.


12a. Does it work for all tractors?
Currently the PTO Link® system works with most rear 6-spline PTO (540 RPM) tractors up to 130 HP (see models below).
See operating specifications.
PTO Link® HD – Ideal for tractors 35 HP to 130 HP. Also, for any tractor with 2.4 m or wider Shedders/Mowers, and any size Flexwing/Batwing rotary cutters.
PTO Link Compact – Ideal for tractors up to 70 HP* (*limited to Category 1 implements ONLY) and those who have PTO splines shorter than 76 mm in length, but can also be used on standard spline lengths greater than 76 mm. The Compact System is REQUIRED for the following tractor models: Kubota BX, B & LX Series, Kioti CS & DK Series, Yanmar SA Series, John Deere 2520, New Holland Workmaster 25S, Cub Cadet 6284D, Bad Boy 3026, LS MT122 and LS MT125.
NOTICE: For pull-behind implements with two-stage or “dual” drivelines (two distinct drivelines connected by a universal or CV joint located midway between the PTO and the main gearbox of the implement), the PTO Link® system may not be compatible and is not generally recommended.
If you need further assistance in evaluating your tractor for compatibility, please call before purchasing: 01433 711 922.
12b. Does it work on all PTO driven implements?
Based on customer feedback, we have determined that the PTO Link® system will likely NOT work with the following implements:
*Backhoe Tractor Attachment
(See exception below) Reason: the distance between the PTO and the implement is likely too close to accommodate the added 5 inches of the PTO Link® system. In normal cases, this length could be adjusted, but would not likely be possible for the shorter backhoe implement shaft. *EXCEPTION: If the backhoe is “PTO to Hydraulic Pump Driven” (vs shaft-driven) and there is enough clearance for the added 5 inches of the PTO Link® system, then the backhoe is likely compatible. Please keep this in mind before ordering for this implement.
Forestry Winch (log pulling winch)
NOTE: This is a unique implement, in that it sits very close to the rear of the tractor and therefore has a very short driveline shaft. But, we have been told by dealers who sell that product, if the Pat’s Easy Change Quick Hitch was added to the tractor, it would likely help to push the implement out far enough so the PTO Link® product could be added and any necessary adjustments could be made, if needed. Generally this implement doesn’t work well with a traditional 3-point quick hitch, due to the placement of the top hook, which is not an issue with the Pat’s Quick Hitch system. Remember, the PTO Link® adds 127 mm to the driveline, therefore, watching the video guide found at FAQ #5 after confirming the measurements, would help to determine if the driveline would allow for adequate space and/or adjustments could be made for use with the PTO Link®).
If you need further assistance in evaluating your tractor or implement for compatibility, please call before purchasing: 01433 711 922.
13. Is the PTO Link® considered an adapter?
The PTO Link® is by design not classified as an adapter, but rather a PTO quick-connect system. By contrast, a PTO adapter (which is not a quick-connect system) serves two entirely different purposes:
-
To intentionally extend the PTO driveline, or
-
To interchange a 540 RPM spline to a 1000 RPM spline.
Also, a PTO adapter is a single-piece device, whereas the PTO Link® consists of two interfacing male/female couplers designed to simplify the connection process between a PTO and the implement shaft. In fact, when the design engineers went through the ASABE certification standards review, the PTO Link® was found to be in compliance with ASABE as long as our quick-connect system was not used in tandem with PTO adapters. This is why our product labelling specifically warns against using the PTO Link with PTO adapters in order to comply with ASABE standards.
14. What is the Plunger Pin / Safety Bolt?
NOTE: This video guide features the original “Plunger Pin”, but we have upgraded that pin with the new “Safety Bolt” (video guide coming soon). The Safety Bolt (Grade 8 pin) serves the same purpose as the Plunger Pin, but can be installed from either the tractor side or the implement side for added ease of installation and removal. The ball detent holds the pin in place. To remove it, simply press it back through the hole when disconnecting the mated couplers.
Spare Safety Bolts are available for the PTO Link® Compact and HD systems. Compact systems will have either the original Plunger Pin or the new Safety Bolt (when ordering a spare).
REMINDER: If you are using the Plunger Pin (with wedge tip) you will need to insert this pin from the tractor side towards the implement side, so when it’s time to remove it, you have easy access to depress the wedge tip down as you press the pin out through the couplers.
If either pin doesn’t easily slide through the couplers, just lift up on the implement coupler to align the holes fully. These pins also serve to align the couplers to the full-locked position.
15. Where is PTO Link® made?
PTO Link® is made in the USA. To ensure product safety and consistency, all manufactured parts (regardless of their origin) are routinely tested and inspected for material specifications, quality control and performance standards in keeping with the relevant HP and torque ratings. All PTO Link® products are compliant with ASABE standards and are assembled in the Texas headquarters prior to shipment.
16. What do I need to know about using PTO Link® with my pull-behind implement?
PTO Link® (HD System only) is designed to work with most pull-behind implements attached to the drawbar. You will need to consider both the maximum angle of the driveline and relational distance of the PTO to the drawbar.
1) Angularity: Always observe and comply with the implement’s operator manual for the maximum turning angle while connected to the PTO. The user should generally avoid all PTO shaft angles greater than 60° on implements with Constant Velocity (CV) joints and 45° on implements with conventional U-Joints (see illustrations below). If the tractor operator needs to make a higher degree angle turn, please turn off the PTO while making those excess angles to minimize the stress on the PTO Link® components. To test the maximum PTO shaft angle degree of turn on any implement while the tractor engine is off, attempt to attach the implement shaft to the PTO while the implement is at the tested angle. If the PTO connection can be easily achieved with the PTO Link® installed at that given tested angle without straining the PTO components, joints, yoke and shaft, you may proceed to operate the PTO Link® system at that tested angle.
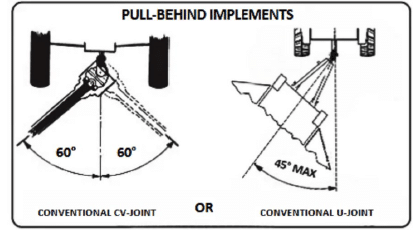
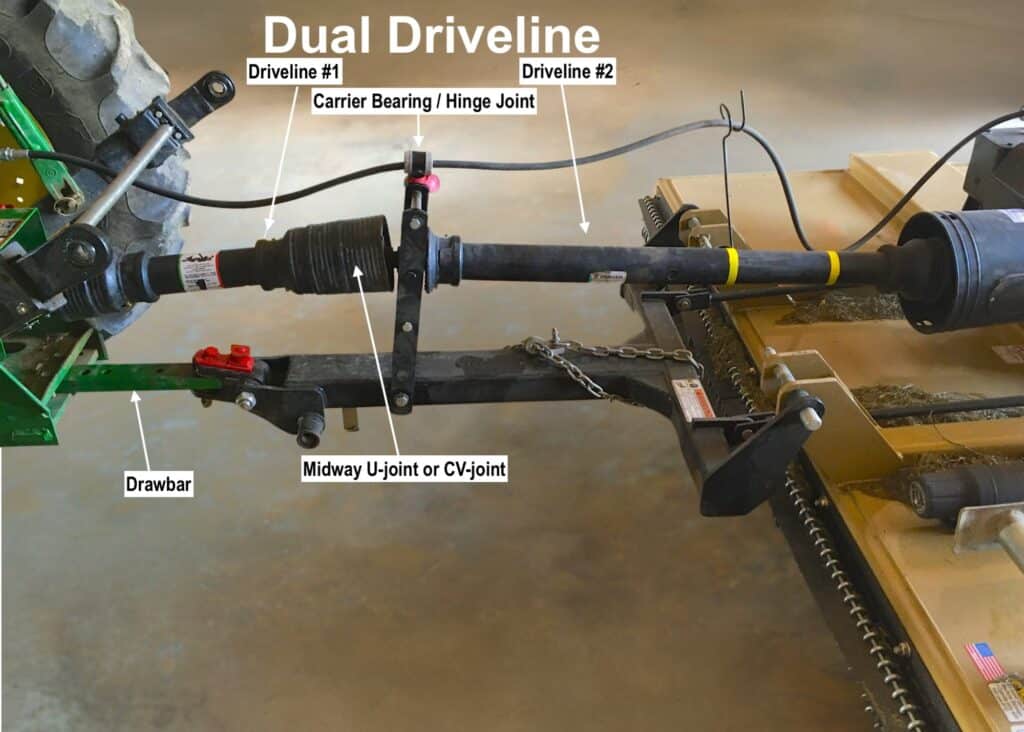
17. Is PTO Link® compatible with my pull behind implement with a dual (two-stage) driveline?
To avoid confusion, the phrase “dual or two-stage drivelines” does NOT pertain to flex-wing mowers that typically have split drivelines with multiple gearboxes, but rather it refers to two separate sections of a single driveline with a universal or CV joint located at a midway point on the driveline between the primary PTO connection and a single gearbox (as shown below).
To maintain the proper geometry and angles of the dual driveline, we generally recommend extending the drawbar 127 mm while using the PTO Link® system to ensure these shorter sections of the driveline are not put in a bind. However, if the drawbar cannot be extended, be sure to measure (and if necessary, shorten) the implement driveline as instructed in FAQ #5 to ensure the 127 mm added by the PTO Link® system does not create a “bottoming out” effect during turns, lifts or inclines—all of which could damage the shaft, the PTO and/or the components of the PTO Link® system. For more information on pull-behind implements, see FAQ #16.
If in question, please call us on 01433 711 922 to confirm.